My Assets is the project’s media pool. It contains files you import, recordings made in ChatCut, and assets created by AI generation. These assets stay with the project and can be reused in any of its timelines.
Find My Assets
Open My Assets in the media panel beside the Viewer. If the panel is hidden, open Workspace in the editor header and enable My Assets.
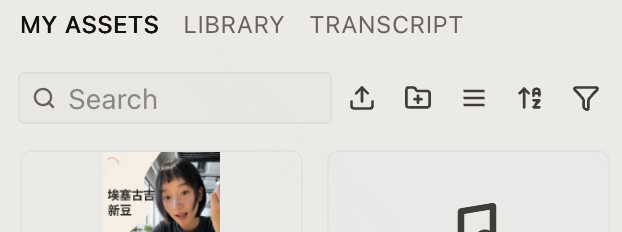
Use the toolbar above the cards to manage a large media pool:
- Enter a name in Search media.
- Select Switch to list view or Switch to grid view. List view exposes source, duration, and status columns.
- Open Sort media and sort by Newest, Name, Type, or Duration, then choose the order.
- Open Filter media to hide media types you do not need. On a narrow panel, New Bin, view, sort, and filter controls may move under More media tools.
Import and use media
Open My Assets → Upload, then choose an import method:
- Files…: select one or more local files. The files appear as project assets in the current Bin.
- Folder…: select a local folder. ChatCut creates matching Bins and nested Bins from its folder structure, then places each asset in the corresponding location.
- From phone…: open a QR code and upload link. Files appear in the current project’s My Assets after the phone upload finishes.
- URL… (Desktop 0.4.21 or later): inspect one video or audio URL, choose compatible quality, language, frame-rate, and audio options, then download it into the current project.
After the asset card finishes processing, drag it onto a video or audio track in the Timeline.
To upload from a phone, scan the QR code or select Get upload link, choose files on the phone page, and keep it open until the upload finishes. If the temporary link expires, reopen Upload → From phone… to create another one.
URL imports run through Desktop’s shared task queue. Closing the project does not turn an unfinished download into a usable asset; wait until the download and project insertion both complete. Retry can reuse a completed download when only the library insertion failed.
What is the difference between a Prompt attachment and project media?
- Select + beside the Prompt composer: attach a file as context for the current message. It is not automatically placed on the Timeline.
- Select My Assets → Upload: add a reusable asset to the current project. You can organize it in a Bin and use it across the project’s timelines.
- Turn on Selection Mode and select an existing asset or clip: add an
@reference without uploading another copy. - Add a file to a first-frame, last-frame, source-video, or reference slot in Video Gen: use it under the selected model’s input rules.
Whichever entry point you use, explain the file’s purpose in the Prompt. Attaching a file alone does not tell the AI to insert it into the edit.
Organize media with Bins
A Bin is a folder inside My Assets. It does not change clips that are already on a Timeline.
- Select Upload → Folder…: import a whole folder and create matching Bins and nested Bins from its directory structure.
- Select New Bin in the toolbar: create an empty Bin. Name it, then drag asset cards into it.
- Command/Ctrl-click or Shift-click several assets, then right-click the destination Bin and choose Move N Selected to Bin: move the selection together.
- Open a Bin, then use the breadcrumb to return to a parent or the full media pool. Search media can find assets in the current Bin and its descendants.
Renaming or moving media does not create copies or remove Timeline clips. Deleting a Bin also deletes the project assets inside it, so review the item count before confirming.
Read an asset card
An asset still uploading, transcoding, transcribing, converting, or generating shows its state on the card. Wait for it to finish before using it in cloud generation or export. A failed card stays visible so you can inspect the failure and use an available retry action.
Right-click an asset card to open the actions supported by that asset type. Depending on the asset and its state, the menu can include:
- Add to timeline or Use with AI.
- Rename, Download, Delete Asset, or Relink File.
- Retry Upload or Retry Transcription after the matching process fails.
- Export Transcript for a transcribed source.
- Add LUT for a compatible source clip or LUT workflow.
- Export motion graphic or Convert to Video for a Motion Graphic. These export/conversion actions can require Pro.
- Add as template to Favorite for one Motion Graphic when Templates are available.
The Copy action in this menu currently applies to Effect and Transition assets. It does not copy arbitrary uploaded video, audio, or image files between projects.
Select and act on several assets
- Command-click on macOS or Ctrl-click on Windows to add or remove individual cards from the selection.
- Shift-click to select a visible range. You can also drag a selection rectangle across cards.
- Right-click the selected group to run a supported multi-asset action. For example, choose Add selected to Timeline, move the selection into a Bin, delete the group, or run AI multicam sync on at least two usable audio/video recordings.
Multicam sync requires overlapping material from the same take. It stages selected My Assets clips at the current playhead and aligns them on the Timeline. See Timeline — Synchronize multiple cameras or recorders.
Repair missing or interrupted media
The two repair actions on an asset card mean different things:
- Grant file access: the original file is still in place, but ChatCut no longer has permission to read it. Select this action to authorize the same file again.
- Relink File: the original file moved, was renamed, or is no longer available from its saved local source. Select the matching original file to repair the existing project reference without creating a new asset or Timeline clip.
To repair several missing files, right-click an empty area in My Assets and choose Relink N Missing Media, then choose a folder. ChatCut searches it for matching source files and relinks the matches together.
Web and Desktop use the same relink actions. On the web, the browser manages local-file permission and cache; on Desktop, the desktop app and operating system manage local-file access. Agent Plugin does not add a separate Relink menu.
If a camera or voiceover recording was interrupted before it reached My Assets, ChatCut checks local recording storage when the editor opens. A message such as Found an unsaved camera recording… Recover? or Found an unsaved voiceover… Recover? includes a Recover action. Select it before clearing browser or Desktop application data.
See Prompt Composer, Selection Mode, and Timeline for the related workflows.